WordPress Training
An Easy to Follow WordPress Guide for Beginners
Menu
Introduction
Modifying Structure
Cache
Updates
1.0 Introduction
WordPress is the world’s most popular content management system, powering roughly 25% of the web. People use it for almost any type of website. This ease of use, intuitive interface, and open source nature all play a huge role in WordPress’ popularity and widespread adoption.
This document will serve as a WordPress manual and will cover just the basics to get beginners up and running: logging into and navigating around WordPress, where to find content, how to edit or create basic content, managing taxonomies, working with media (images, videos, PDFs, etc), how to change the navigation, adding or removing users, and a few more advanced things. We promise not to get overly technical. And, as always, if you have any questions, please contact us at development@aheliotech.com.
This document was created to provide clients and new WordPress users with a better understanding of how to manage your site. It should be used as a general reference guide for day-to-day administration of your website. It is not an all-inclusive manual for WordPress nor is it meant to be a handbook for making extensive modifications to existing site design or structure.
One of the best aspects of using WordPress is that tutorials are extremely easy to find on the Internet. If you find yourself needing or wanting to learn more about WordPress I have provided a few free resources below that are very popular.
If you have questions or need assistance with the general management of the CMS, please email us at development@aheliotech.com.
1.1 Logging In
To log in to your website go to: YOUR WEBSITE URL/wp-admin
Enter your username and password. You can check the “remember me” box if you will be using the same (non-public) computer to return to the website later and want to be logged in automatically. If this box is checked, your browser keeps you logged in for 14 days. If unchecked, you will be logged out when you quit the browser or after two days.
If you don’t remember your password, click the “Lost your password?” link below the form. Enter your username or email address and you will receive a link to create a new password via email.
Once entered you will be taken to the WordPress Dashboard.
2.0 Managing Content Types
The two main content types in WordPress are pages and posts. While they share many similarities, there are some key differences:
- Posts are custom to your website and are typically ordered chronologically by date. They often have pre-determined formats so that the information displays consistently on the front end. They can have categories and/or tags attributed to them or other custom criteria specific to the post type. We go into more detail your unique post types later in this document.
- Pages are not listed chronologically and they do not use categories and tags. Pages are often static content and are usually what appear in your sites main menu. Pages are hierarchical in nature.
2.1 Pages & Posts Lists
Clicking a page or post type in the menu bar will open a list of all pages or posts (according to the post type you selected). Here you will commonly see the following:
- Page or post title
- Author
- Categories
- Date published
Clicking the title of a page or post will open in the editor. Hovering over a title will reveal the following options:
- Quick Edit: Allows you to change the meta information such as categories without opening it in the editor
- Trash: Moves the post to the trash folder. You can recover anything that you have put into the trash for up 30 days
- View: Will go to the publicly visible page or post
You can use the checkboxes next to the titles to perform actions on multiple items. After checking one or more boxes, the Bulk Actions drop-down shows you the actions that can be performed including Edit and Move to Trash.
You can filter the list of pages and posts by dates (month and year) or categories. The pagination control allows you to step through the list of items one page at a time. Lastly, you can search for words or phrases that may be contained in your posts.
2.2 Adding or Editing Pages & Posts
This section will cover the basics of adding or editing posts. More details about using the content editor and adding or editing post types that are unique to your site are described later in this documentation.
Adding a Page or Post
Pages or posts can be added by hovering over +New in admin bar and clicking your desired content type or by hovering over the desired content type in the sidebar nave and clicking Add New.
Editing a Page or Post
Pages or posts can be edited by navigating to the page or post you want to edit on the front end then clicking Edit in the admin bar or by selecting the page or post from the list and clicking Edit.
Content Editor
The content editor is visible when adding or editing a post or page. The editor uses a WYSIWYG (What You See Is What You Get) toolbar that is similar to word processing software and text editing applications. You’ll also be able to add copy, links, images, and other media to your pages and posts.
Visual Composer
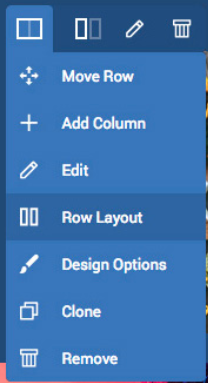
Your site uses a page building plugin which can replace the content editor, allowing you to create dynamic layouts without needing to write any code. Visual Composer essentially overrides the basic functionality found in the WYSIWYG editor and provides a visual editing tool. This gives you the ability to create rows and elements that are easy to edit by clicking on the pencil icon that pops up when you hover over each block. Visual Composer also allows you easily move elements and rows around the page by using a drag and drop method. When you hover over each block you will see an arrow icon that points in all four sides. You can use this to drag each block or row to your desired location. Be careful when doing this as it will change the layout of your page and may cause some elements to not be displayed properly. Below is the full list of icons that you will see and how you use them.
Adding Links
Links are added the in a very similar manner that you would in email text editors.
- Create the text that you want to use for the link and highlight it.
- Copy the URL that you want to use to send people to.
- Note: If you are creating a link to a Word Document or PDF that is in your Media area, you will need to copy the URL from the media section of your site. To do this simply go to “Media.” Click on the image of the document you want to use. Copy the URL from the URL line on the right.
- Highlight the text that you created for the link and clink on the link icon. This will bring up a box for you to paste the URL in. Once it is pasted, press the blue arrow button and then “Save Changes” at bottom of window.
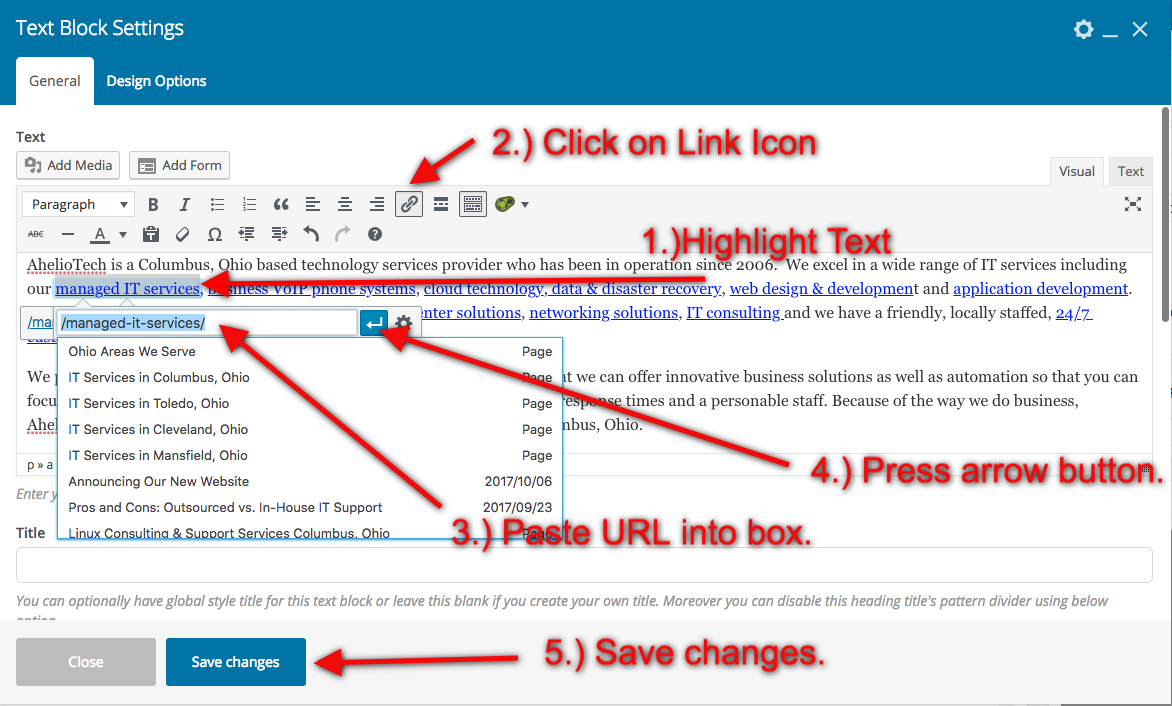
- Make sure you update your page in the top right corner of the page your working in.
Adding Media to a Page
Media can be added many different ways. Two of the most popular methods is by using the text editor or by using an image element. When using the text editor to add an image you will simply click on the “Add Media” button on the top left to add an image. This image will be added where the curser is positioned. Once the image is loaded you can click on it to resize it by dragging it from the corners to make it bigger or smaller. You can also change the size by pressing the pencil icon in the toolbar above the image. You can make changes to the alignment by using the toolbar that is above the image.
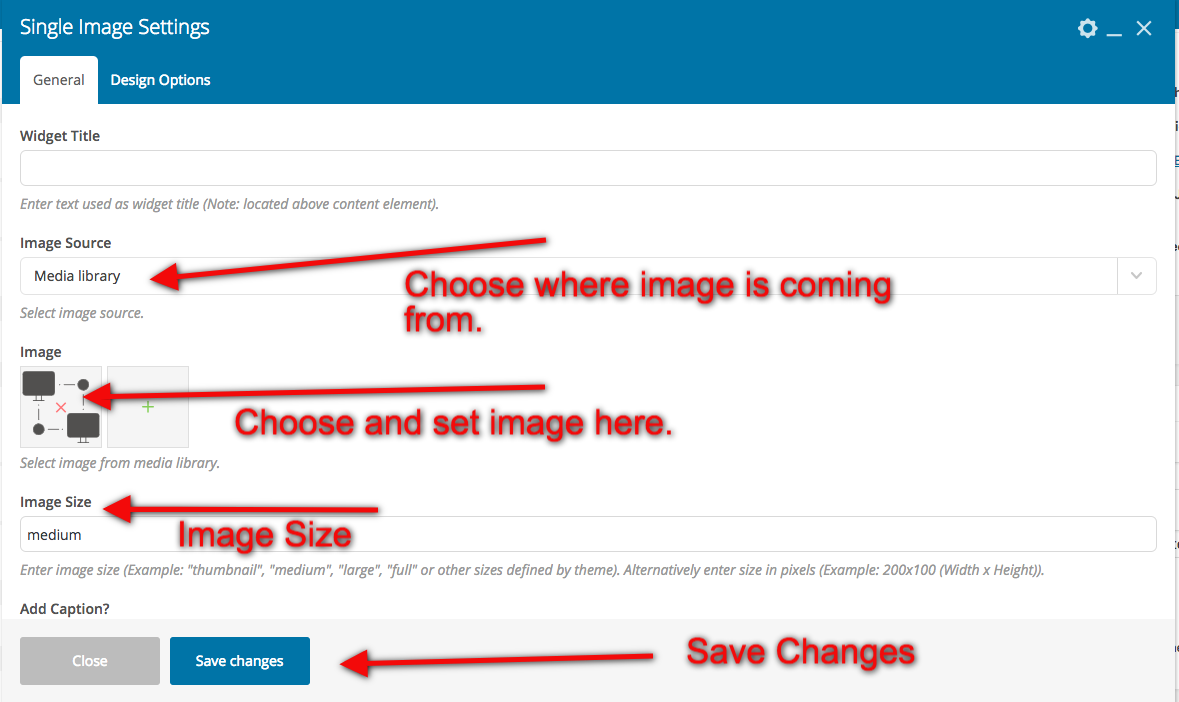
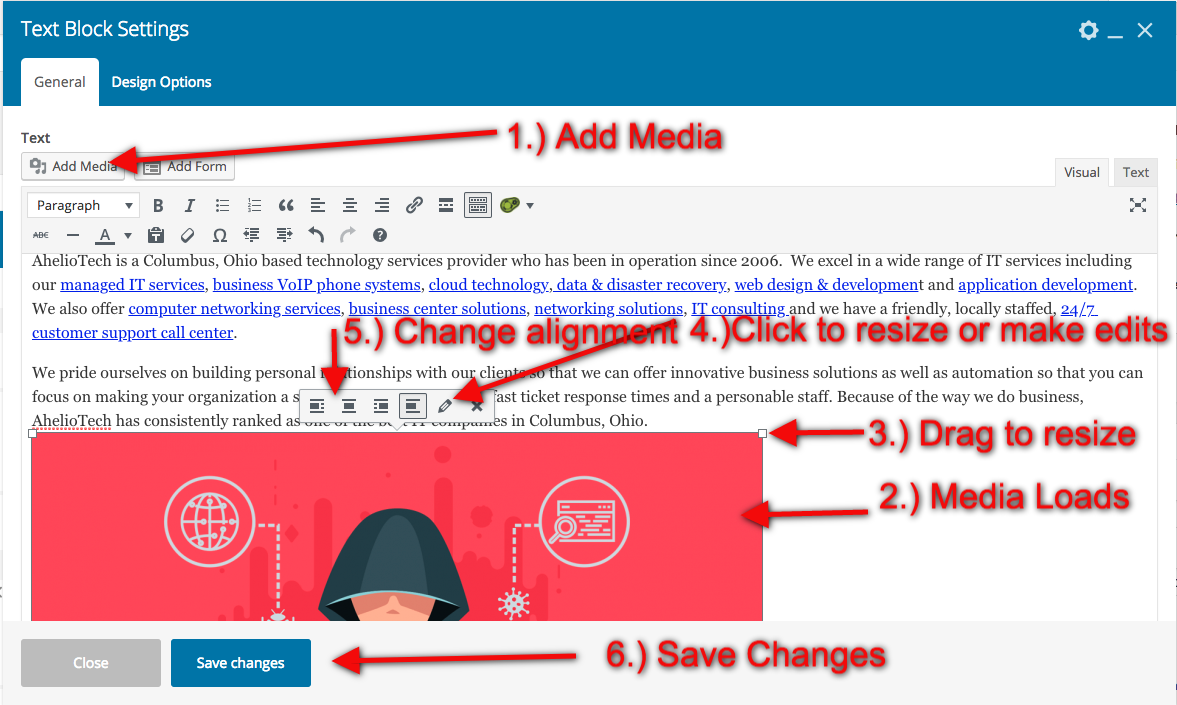 Image Elements: Used in drag and drop style page builders. If you have a page builder on your site you will most likely have an image element. (Note: Instructions will differ depending on what Page Builder you are using. Below is for WP Baker Pagebuilder. This is a generalized way to doing it as there are multiple ways to lay out the images. For more information, go to your Page Builders website for additional help)
- Add a row where you want your image to appear on the page by clicking the “+” icon. This brings up all of your elements. Select Row.
- Press the “+” icon on top of the row you just added to bring back up the element icon menu and select “Single Image”
- Use the drop down “Image Source” to set where the image is coming from. This is usually set to Media Library.
- Click on the green “+” in the Image square to choose your image.
- Use image size to set the size of the image.
- You can add a caption under “Caption.”
- Use “Image Alignment” to place your image to the right, left or center.
- Explore the rest of the settings as you scroll down to make further changes.
- Save Changes
Saving & Publishing
Once you’ve added or edited your content you have three options (blue button) found in the publishing panel in the upper right:
- Clicking the Publish button will make your page or post public
- Clicking the Save Draft button will save your page or post but it will not be visible to the public. This is handy if you would like to come back at later to edit it or if you’re simply not ready to publish yet
- Clicking the Preview button will show you a preview of the current page or post. This is helpful as you lay out your content, allowing you to get it right before making it public
There are also several other options available in the publish panel:
- Status: There are three statuses which can be changed by clicking the Edit link.
- Draft is the default status and will change to Published once you have published the page or post
- Published means the page or post is public facing
- Pending Review means the draft is waiting for review by an editor prior to publication
- Visibility: You can also change the visibility of the page or post by clicking the Edit link.
- Public is the default and means the page is viewable to all
- Password Protected allows you to assign a password to your page. Only people who have the password will be able to access the page
- Private hides the content from the public completely but be visible to anyone with a link to that page or post
- Published on: Allows you to change the date the page and post was published. You can also modify this timestamp to a future date if you would like the page or post to schedule the post to be published.
2.3 Other Content Elements
Some content sections are only visible on certain content types. Below are some of the other elements you may encounter when editing your site.
Page Attributes (Pages Only)
This box contains options which determine where the page is located on the site and how it is displayed. The “Parent” dropdown allows you to select which section or context a page should live in while the “Template” dropdown controls how the page is displayed. Most pages on the site use the “Default Template” option, but for certain specific scenarios, like landing pages, other templates may be more appropriate. When in doubt, refer to similar, existing pages.
Categories and Tags (Posts Only)
Categories and tags are a way of organizing content within a site or blog so that users can easily find related content. Categories are selected using checkboxes whereas tags are created by typing them into the tags area . More information on categories and tags can be found in section 3.0 – Taxonomies.
2.4 Custom Post Types
While WordPress’ standard content include “Posts” and “Pages” as the two main types, it is often necessary to add additional content types for things such as “Staff Bios”, “Job Openings”, “Events”, etc. WordPress offers easy solutions for extending built in functionality with Custom Post Types (CPTs), another reason for its popularity. Please contact AhelioTech for more information on how to set up and use these plugins to create different post/pages types.
3.0 Taxonomies
Taxonomies are simply a way of classifying content, making it easier for users to find similar or related content. They’re generally used in the blog section of a website but custom taxonomies can be added to other sections as needed. WordPress generally breaks taxonomies down into one of two types: “Categories” and “Tags“.
3.1 Categories
Taxonomies are simply a way of classifying content, making it easier for users to find similar or related content. They’re generally used in the blog section of a website but custom taxonomies can be added to other sections as needed. WordPress generally breaks taxonomies down into one of two types: “Categories” and “Tags“.
3.3 Managing Taxonomies
The initial creation of taxonomies is usually done during the Information Architecture phase and assigning categories and tags to content will be done during the creation and editing of individual content items, such as posts. However, it is sometimes beneficial to see / edit the taxonomy as a whole. You can do this by selecting “Posts > Categories” or “Post > Tags” from the main administrative menu.
From here you can create or remove individual taxonomy items or rename them. Renaming a taxonomy item changes it for all pieces of content that use it. You can also change the “Slug” or URL of the taxonomy, but this may affect links within your site so only do this if you know what you are doing.
Also note that “Categories” and “Tags” are the default taxonomies for the default “Posts” content. It is possible to have custom taxonomies for custom post types. The names may vary but they function the same.
Creating and editing taxonomies may lead to unexpected, or unwanted results for functionality, SEO, or user experience. Therefore, please only do what you know is safe.
4.0 Media Library
The initial creation of taxonomies is usually done during the Information Architecture phase and assigning categories and tags to content will be done during the creation and editing of individual content items, such as posts. However, it is sometimes beneficial to see / edit the taxonomy as a whole. You can do this by selecting “Posts > Categories” or “Post > Tags” from the main administrative menu.
WordPress manages all media uploads like images and documents (PDFs, etc.) in the Media Library. The Media Library displays items in a grid view, as thumbnails only, or a list view.
4.1 Adding Media
Adding items to the Media Library can be done by dragging and dropping the files you want to upload. Alternatively, you can click Add New by hovering over Media Library in the sidebar menu or at the upper left of the Media Library itself. In order to keep file sizes down to a minimum, we recommend running your image through TinyPNG before you add it to your website. This will help enable faster load times and help prevent your website from running slow.
4.2 Viewing Media Details
Clicking a media item will display the media details, including the URL which is helpful if you are hyperlinking text to a media item download.
4.3 Replacing Media
Click on the media item you want to update in the Media Library to get the attachment details. On the right there will be a link to upload a new file. This works for any type of media including images, audio, video, pdfs, and other documents and will replace the media item anywhere it may already appear on the site.
5.0 Modifying Structure
While much of the structure of the website will have already been defined by the design and development teams, there may be occasions where you wish to make modifications to the structure within the CMS.
5.2 Widgets
Widgets are a way to add functionality and interactivity to global elements of a site, like sidebars and footers, without having to write code. While the majority of the functionality and widget setup happens during the build of the site, it may occasionally be necessary to add additional widgets to the site.
Widgets can be found under “Appearance > Widgets” from the administrative navigation. Adding a widget is as simple as dragging it from the “Available Widgets” panel on the left into the appropriate region on the right.
Once in place, clicking on a widget will expand its panel showing any configurable options.
6.0 Users & Comments
Like most content management systems, WordPress has the ability to store multiple user accounts for logging into the CMS and managing the website.
6.1 Managing Users
At times it may be necessary to add or remove user accounts if people join or leave the organization. WordPress allows you to easily accomplish this within the administrative interface. Select “Users” from the administrative sidebar. You will see a list of users, which you can then modify or delete.
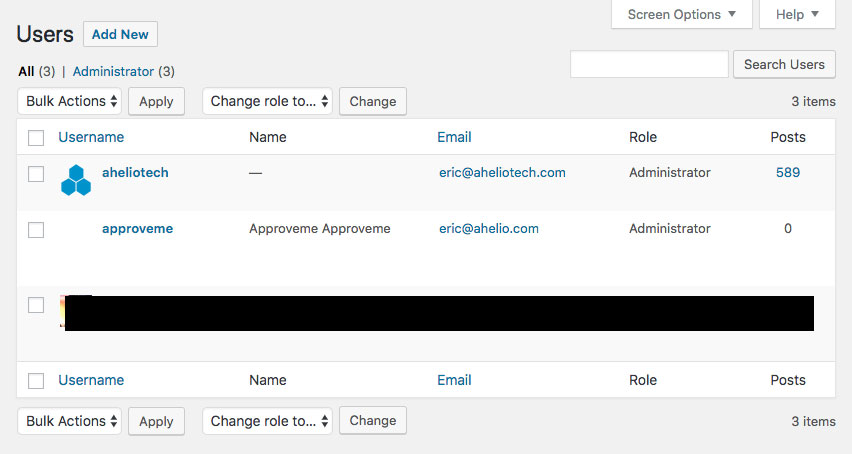
By using the “Add New” button you can also easily create new user accounts on the website. The account creation screen includes a checkbox for alerting the user of their newly created account or you may choose to notify them manually.
When creating new accounts make sure to select the proper user role. Setting users up with the correct user roles will help with the security of your website as well as keep your site and content looking and functioning properly. Ideally you will want to have only a small number (1-3) of administrators to your site. The more people that have access to making content changes to the site, the more chaotic upkeep becomes. It is best to only have 1 or two people responsible for the upkeep of the site as to not have too many cooks in the kitchen.
6.2 User Roles
WordPress has six pre-defined user roles that control what users can and cannot do within the website. Each role is allowed to perform a specific set of tasks. These six roles are:
Administrator
Has access to all the administration features within the site. This is the highest role and has access to manage and change everything so it is ideal to have the fewest Administrators as possible.
Editor
Can publish and manage content, including the posts of other users.
Author
Can publish and manage his or her own content.
Contributor
Can write and manage his or her own content but cannot publish.
Subscriber
Can only manage his or her profile.
More information about WordPress’ built in user roles and their capabilities can be found here: //codex.wordpress.org/Roles_and_Capabilities
6.3 Edit Your Account
You may customize your settings by visiting the profile page within WordPress. The profile page can be found via the left sidebar under “Users > Your Profile” or by selecting the “Edit My Profile” link from the top right dropdown menu on the administration bar. Here you can select your administrative color scheme, change how your name is displayed on content you create such as blog posts, and update your WordPress password.
7.0 Cache
Caching is a technique which lets the server or browser serve a pre-built version of the page rather than going through the whole page-building process each time a visitor comes to the site. What is important to know is that sometimes, after you make an update on your site, you may not see it reflected on the live site. Your change has been saved, but the server is still using the old version. All you have to do is tell the server that there’s a new version to use, and you do this by clearing or refreshing the cache. This is located at the top in the toolbar.
8.0 Updates
You will see notifications on updates to WordPress or plugins which appear at the top of the dashboard or in the admin bar. Updates happen constantly and occur for several reasons including bug fixes, security patches, and general improvements. Therefore, it’s very important to keep you WordPress website up to date.
However, in some rare cases, updates can break a website visually or functionally so it is very important to handle updates properly. This usually means testing updates on a staging site first, then running the updates on the production site. It is also important to keep regular backups of your site in case something does go wrong.
For users that are not comfortable doing updates or want someone else to worry about performing them AhelioTech offers a service plan where we handle all of the updates for our clients. Please contact us for more information if you are interested in this service.
If you have any questions, please contact AhelioTech.

6.4 Comments
Blogs are a great way to encourage users to interact with the site in the form of comments. Comments can be found under the “Comments” link in the main administration menu where they are held for moderation before they appear on the website.
You can browse through all site comments via the familiar WordPress interface. From this screen you can easily approve, unapprove, edit (not recommended), or delete comments from the website.
There isn’t much more to say about comments, except that they should be moderated on a regular basis for legitimacy. In some cases, comments may contain security threats or spam. For most projects it’s a good idea to turn comments off or enable Anti-Spam protection.
Akismet is a great choice for an anti-spam solution. It is installed with WordPress by default, but to activate it you will need to register an account with WordPress.com (note the .com nor .org) in order to get an API key. You can use the API key on any number of sites, and once you have the plugin set up, it will block almost every instance of spam, and can even remove previous spam comments.